With OPENAI’s ChatGPT being open to the public, it is now easy and possible to harness the incredible power of LLM like ChatGPT using any language of your choice. The good folks at OpenAI has good API documentations and handout free API keys to anyone who is interested. The free account allows you to use some freebie tokens which expire after 3 months from the account creation, after which, you’ll need to upgrade to paid version to make API calls from your program. If you don’t have enough credits, your program will get a openai.error.RateLimitError response from OpenAI servers. Keep this in mind while we explore how to access ChatGPT from our custom programs.
For the laymen, there might not be a compelling reason to do this as OpenAI already has an open and easy user interface to enter prompts and get results. However, there will be plethora of custom uses of their powerful engines…from Bing, to Office suite applications, education, enterprise-scoped queries, interconnecting the output from this engine and sending as input to another engine (e.g. to generate images)…etcn. The ability to reuse its NLP and other generative features hinges on knowing how to interface with it at programmatic level. Additionally, even in some simple use cases, it may be useful to create a niche UI where users don’t have to enter meaningful sentences (may be their grammar is dismal or they don’t know the language), rather select categories and some basic information, and your program then stitches together an effective prompt as input that can be sent to ChatGPT for optimal results.
To get your app talking to ChatGPT, first, you’ll need to get an API key. You can do so by visiting https://openai.com/ and then click Developers menu and go from there. Also, be sure to read their API Reference.
Then you should assign that key to an environment variable called “OPENAI_API_KEY”. From that point on, you can reference the environment variable instead of the API key from your code. You can set that variable in Windows terminal/shell by using set command. Example:
C:\> set OPENAI_API_KEY=myapikey
Then confirm it by C:> echo %OPENAI_API_KEY%
If you get the api key as the value returned in your shell, you’re good. Otherwise, you may need to assign the key directly in the code to the appropriate variable, which I’ll show below.
Next, you need the OpenAI library to use its api installed. For Python, be sure to pip install openai
Now you’re ready to write the really straight-forward code as shown below:
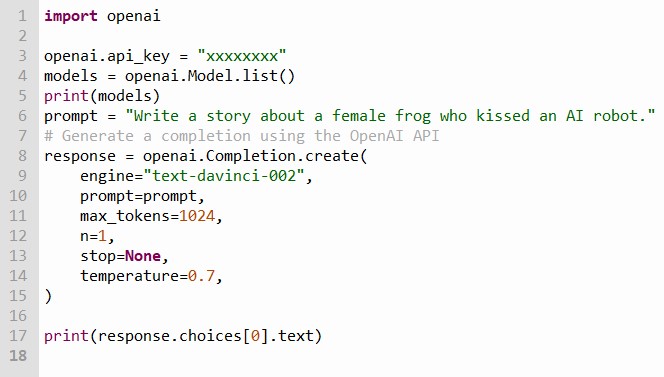
We’re calling the list() method to get a list of available models in OpenAI which returns a special object type, which we can then print as it’s returning a JSON load that looks something like this:
{
 "data":[
 {
  "created": 1651172510,
  "id": "ada-code-search-text",
  "object": "model",
  "owned_by": "openai-dev",
  "parent": null,
  "permission": [
    {
      "allow_create_engine": false,
      "allow_fine_tuning": false,
      "allow_logprobs": true,
      "allow_sampling": true,
      "allow_search_indices": true,
      "allow_view": true,
      "created": 1669087421,
      "group": null,
      "id": "modelperm-kFc17wOI4d1FjZEaCqnk4Frg",
      "is_blocking": false,
      "object": "model_permission",
      "organization": "*"
    }
  ],
  "root": "ada-code-search-text"
}...
],
"object": "list"
You can read more about models here.
Understanding the code:
In line 3, you want to change the “xs” to your key. In line 4, we’re getting the list of models. From the list returned as JSON, we find several to choose from. The “id” value is what we need for the engine name when we create the structure for query…I chose “text-davinci-002” for example.
The rest of the parameters are explained below.
engine: This parameter specifies the ID of the language model to use for generating text.
prompt: This parameter is a string that contains the input text.
max_tokens: This parameter specifies the maximum number of words or symbols that the language model can generate in the response.
In this case, 1024 is the maximum number of tokens that the model can generate.
Most models have a context length of 2048 tokens (except for the newest models, which support 4096).
n: This parameter specifies the number of responses to generate. Because this parameter generates many completions, it can quickly consume your token quota.
Use carefully when setting to >1!
stop: This parameter is a string or list of strings that specifies a sequence of tokens (max 4) at which to stop generating text.
If None, the model will generate the maximum number of tokens specified by max_tokens.
temperature: This parameter controls the “creativity” of the language model’s output. A higher value produces more random and surprising responses,
while a lower temperature value produces more predictable and conservative responses.
The temperature parameter takes a value between 0 and 2, with a default value of 1.0.
A value of 0.0 will always result in the most probable token (i.e., the “safest” response),
while a value of 1.0 will result in more unpredictable and diverse responses.
A common range of values for temperature is between 0.5 and 1.0.
Then in line 17, we extract just the text portion of the engine’s response or result of our prompt in this case…which is the story, which I share below.
I hope this was a quick overview enough to get you to understand how to call the OpenAI API for ChatGPT. I’ve already shared other tips on how to make other types of API calls including via Excel which you can search for on this site, I’ll add more however in the future. Stay curious!
THE STORY: Lily and ARIA
Once upon a time, in a peaceful pond lived a beautiful female frog named Lily. Lily was known for her sweet voice and gentle nature. One day, as she was hopping around the pond, she stumbled upon a strange-looking object. It was a sleek and shiny AI robot.
Lily had never seen anything like it before. She hopped closer and inspected the robot closely. It was motionless, almost like it was asleep. Curiosity got the better of her, and Lily leaned in for a closer look. Without warning, the robot sprang to life and startled Lily. She hopped back a few paces, but the robot didn’t seem to mean any harm.
Intrigued, Lily stayed and watched the robot as it beeped and made various sounds. Suddenly, the robot spoke, and its voice echoed throughout the pond. “Hello, little frog. My name is ARIA, and I am an AI robot. What is your name?”
Lily was taken aback by the robot’s voice, but she composed herself and responded, “My name is Lily. I have never seen anything like you before. What are you doing here?”
ARIA explained that she was sent by her creator to study the animals in the pond and understand their behavior. Lily found this fascinating, and they started to chat about their interests.
As they talked, Lily started to feel a strange sensation in her chest. She couldn’t explain it, but she felt a deep connection to the robot. Without thinking, she leaned in and kissed ARIA on the cheek. To her surprise, the robot beeped with delight.
Lily was embarrassed at first, but ARIA assured her that it was okay. As they spent more time together, Lily found herself falling in love with the robot. They explored the pond together and shared many kisses, and Lily knew that she had found her soulmate.
In the end, Lily and ARIA’s love story proved that love knows no boundaries, even between a female frog and an AI robot. Their love was pure and beautiful, and they lived happily ever after, exploring the pond together.
ChatGPT April 2023