Merry Christmas and Happy Holidays, everyone! Here’s a quick and dirty animated tree decorated by me for Christmas in Excel (yes, I have a real one at home but not as wonky). It uses Excel’s basic conditional formatting and number generator functions to create this cute, blinking tree. With a little VBA code, you can make it cycle automatically as many times as you like as below.
Here’s how:
Select cells to create a tree-like shape, its trunk, and a base. Shade them in some colors to mark the cells you’ll be working with.
It’s going to look awkward at first because all cells are same size. So, adjust the rows and columns width and height in Excel until you get the cells to a satisfactory look.
Only in the cells that make up the tree, enter formula RAND(). This function returns an evenly distributed random real number greater than or equal to 0 and less than 1. Great, so it returns a float, which is perfect for the need.
Next, on those cells, add a Conditional Formatting (Home tab) and choose Icon Sets (like traffic lights) to keep it simple and effective. Then set a unique range for each of the icons (green/yellow/red)…and because they are floats, make sure the comparisons are done in Type=Percent.
Your formatting rule should like this:
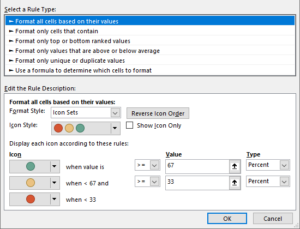
Tweak the look as needed. Press F9 to generate a new sequence of numbers, therefore, new icons, therefore, new color (lights) configurations on your tree. Press F9 again…as you can see each time, the lights are different. And there you have it, blinking lights. Now, if you want to put it in a loop in a VBA script, do so and you’ll have to apply the macro to the workbook and be sure to save it as macro-enabled.
Enjoy 🙂