Here, I show step-by-step a complete weather application built using Python. Along with the critical explanations, the full source code is also included. The app makes a RESTful API call to weather service, gets the results back in JSON, then it parses the information and presents it in locale-specific format. The information we will send to the web service is simply the city name (and it can be any city in the world).
We will get back and will parse: location info (latitude, longitude), country info (because same city name can exist in different countries), simple description of weather, specific high-low temperatures, “feels-like” temperature with windchill factored in, sunrise and sunset times, humidity, wind speed.
To keep focused on the actual code to make it all happen, we will create is a shell application and not worry about the extra code for a GUI application (GUI in Python is or will be discussed in other posts).
The Web Service
We’ll use openweathermap.org’s web service, which is free. It requires an API key, which you have to get individually. My API key is not shown here, rather the variable api_key is set to that key, a string, which is shown with the placeholder “yourAPIkey” in the code below.
Once we get the API key, we construct the API URL string passing the name of the city (which is a user-input), the API key, and optionally the units code (we’ll see that later)…then we append these parameters to the base url, which is: “http://api.openweathermap.org/data/2.5/weather?”
The key to pass the api key is “appid”, for city it is “q”, for unit it is “units”.
Explanation
The full source code is below but I wanted to call out a few things to aid in explaining the code.
Once we import the required libraries to make the whole app work, and built the complete url with our api key and city name, we use get() method to get the response back as a JSON payload. get() is a method of requests object, which is in requests library we imported in the beginning of the program (see Full Source Code section below).
After we get the response, we turn it into a json object to work with in the rest of the program. jason library was imported for this purpose which is then accoomplished with this line: r=response.json()
The response is arranged in the following way. Different services package the response differently within JSON, so before we parse it we have to understand how the data is arranged by this service.
Let’s take a peek at the JSON payload:

So, we can now see the data is arranged in dictionary objects and arrays. This is critical for extracting the values correctly.
For example, to get the description (which is a textual one-line explanation of the current weather such as “clear sky”, “partly cloudy”, etc.), we see its key is ‘weather’ and it’s an array, inside which the ‘description’ key lives as a key:value pair within its first index. So to access the value for ‘description’, we need r[‘weather’][0][‘description’]
The temperature, by default is returned as Kelvin…which we don’t normally speak. So, to get it in Fahrenheit, I passed the units parameter in the URL and set to it to “imperial”. (This type of details is available on the openweathermap site when you sign up for the API key.)
The other thing to point out is that sunrise and sunset times are in UTC timestamp. No, not in UTC format, but a timestamp. This is something I struggled with a little bit since I don’t use Python that often and much less the timezone libraries. The key is to convert the timestamp into a UTC date time object! Then we get a human-readable time format, but alas, it is in UTC timezone, which is 7 hours ahead of my time-zone! So, the sunrise and sunset times don’t mean much to me unless I convert it to a timezone that makes sense. I could have explicitly use PST timezone, but better yet I make the app use the locale setting of the computer it’s running on. That way, no matter where the app is supplied, it’ll always the relevant time format. Additionally, I show the UTC time value for reference.
Finally, the app creates a URL string for google maps, which takes latitude and longitude values (we get that back from the JSON load for the city we passed to it), then using webbrowser object’s open() method to show the page in the default browser.
The Execution
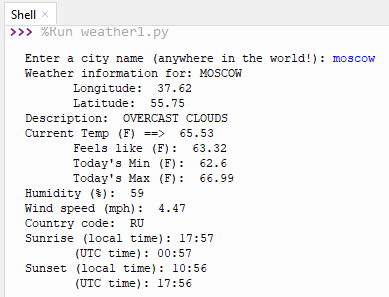
Here’s a snapshot of information executed on city “moscow”…
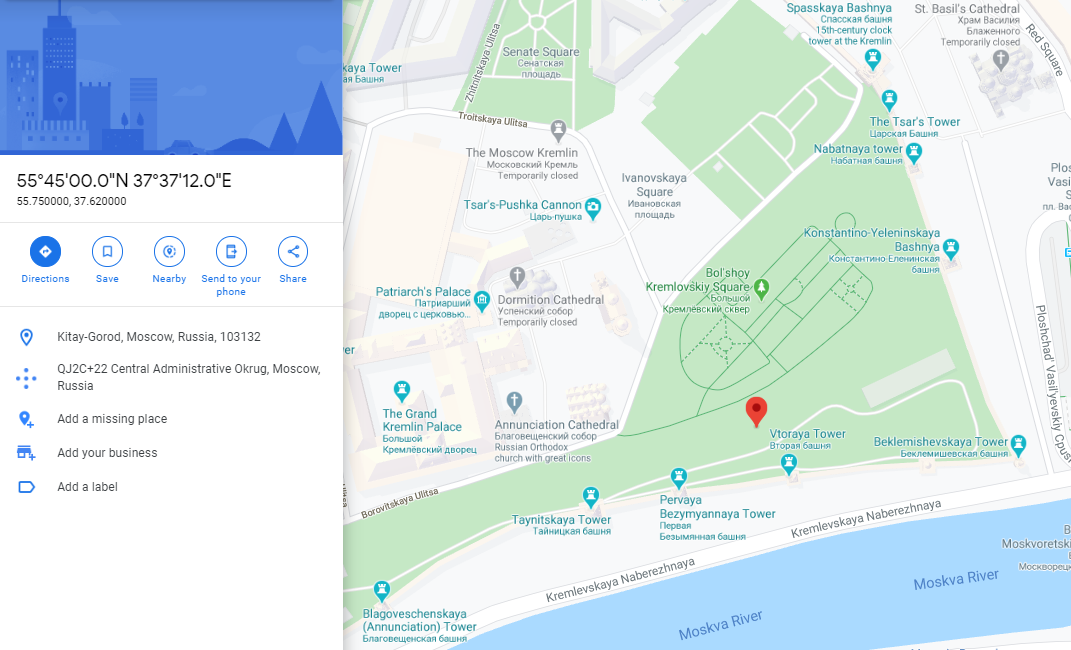
And immediately after the shell output, the app opens your default browser showing the exact location of the interactive map:
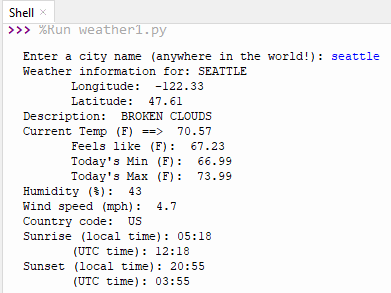
Here’s a snapshot of information executed on city “seattle”…
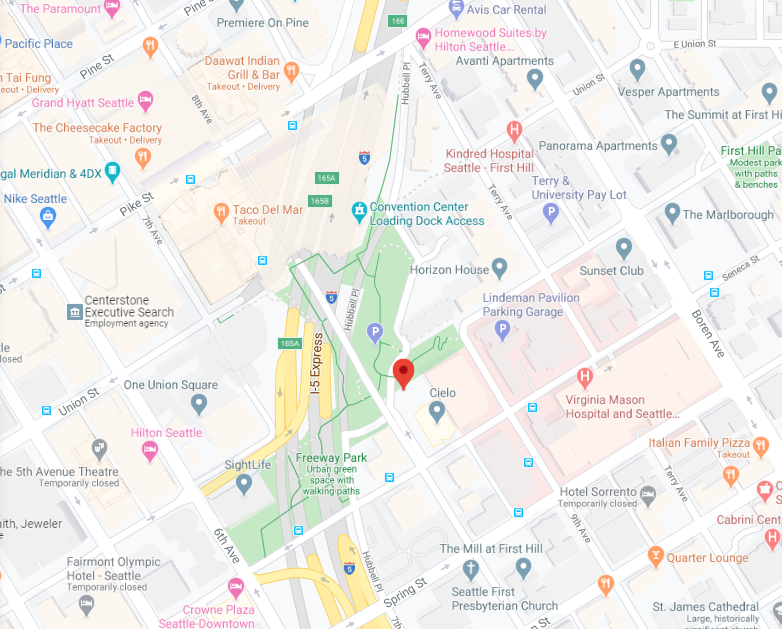
App showing Seattle info in the browser:
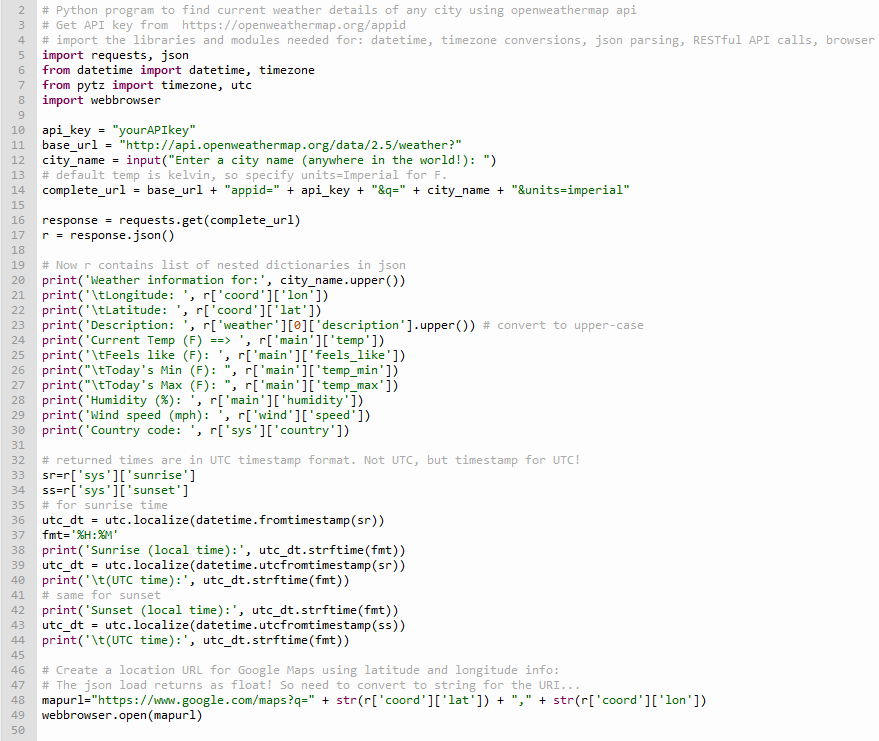
Full Source Code
Try it in the Cloud!
Just click on Run button in the embedded frame below. (Limitation: Because it’s hosted in a different server, the browser auto-open functionality will not work to show Google Map in this frame, but will work on any local machine).